
Making homemade bubble solution is an easy way to rescue an empty bubble bottle or prepare enough bubbles for an entire afternoon outside. This simple recipe uses water, dish soap and one optional strengthening ingredient to create longer-lasting bubbles.
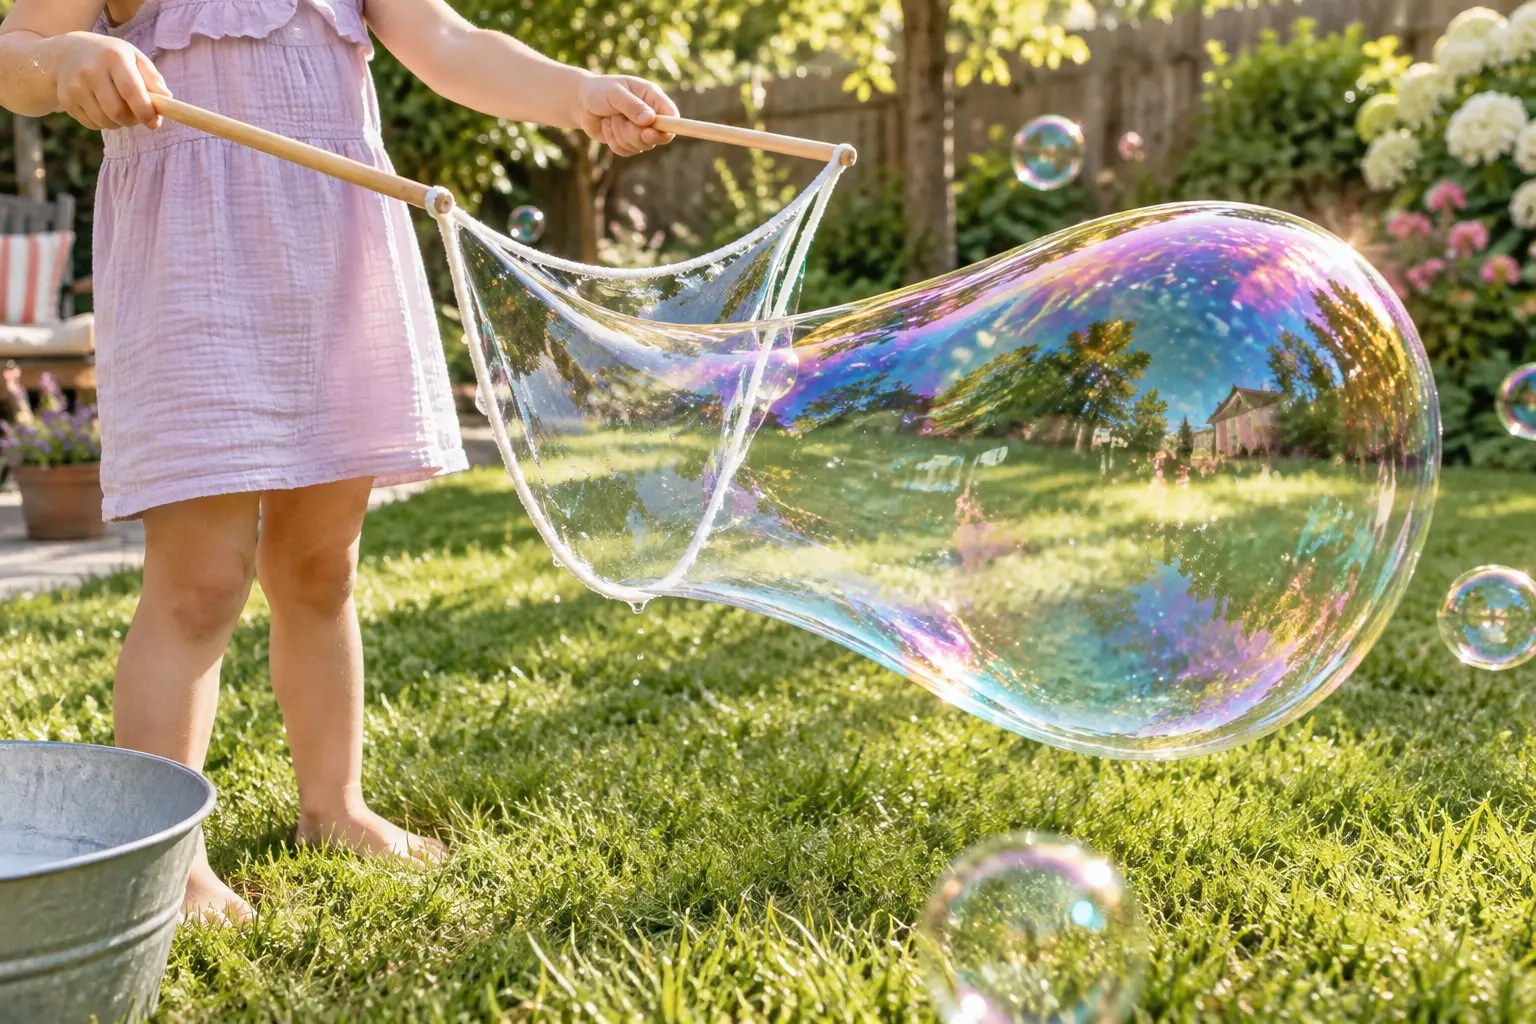
A simple homemade bubble solution can be used with regular wands, kitchen tools or giant bubble makers.
Bubbles are inexpensive, easy to set up and almost endlessly entertaining for toddlers. Children can blow them, chase them, pop them or simply watch them float across the yard.
Bubble play also gives children a reason to run, reach, track moving objects and coordinate their hands and eyes. Holding and controlling a wand can complement other fine motor activities for preschoolers, while chasing bubbles adds plenty of whole-body movement.
Quick Answer: Slowly combine 2 cups of water with 1/3 cup of liquid dish soap. Gently stir in 1 tablespoon of glycerin or light corn syrup, then let the solution rest for several hours before using it.
Why make bubble solution at home?
Store-bought bubble bottles have a mysterious ability to spill approximately three minutes after they are opened. Keeping a homemade recipe on hand means the activity does not have to end when the bottle tips over.
A larger batch also makes it easier to try different bubble tools, set up a bubble station for several children or experiment with giant bubbles.
During bubble play, children can practice:
- Gripping and controlling a bubble wand
- Using slow, controlled breaths
- Tracking moving bubbles with their eyes
- Reaching, running, jumping and balancing
- Taking turns with shared supplies
- Observing wind, reflections and changing shapes
Simple bubble science: Soap molecules help water stretch into a thin film. Glycerin or corn syrup slows evaporation and can make that film more flexible, helping some bubbles last longer before they pop.
For more opportunities to explore cause and effect, try one of these easy toddler science activities.
Easy Homemade Bubble Solution
A reliable small batch for regular bubble wands and outdoor play.
Ingredients
- 2 cups water
- 1/3 cup liquid dish soap
- 1 tablespoon vegetable glycerin or light corn syrup
Supplies
- Large bowl, pitcher or container
- Measuring cup and tablespoon
- Long-handled spoon
- Bubble wands
- Clean bottle or lidded container for storage
Best results: Use room-temperature or slightly warm water rather than hot water. Stir slowly to avoid creating a container full of foam before the bubble solution is ready.
How to make homemade bubble solution
- Measure the water. Pour 2 cups of room-temperature or slightly warm water into a clean bowl or pitcher.
- Add the dish soap. Pour 1/3 cup of liquid dish soap slowly down the inside of the container to minimize foam.
- Stir gently. Move the spoon slowly through the water until the soap is combined. Avoid whisking, shaking or beating the mixture.
- Add a strengthening ingredient. Gently stir in 1 tablespoon of vegetable glycerin or light corn syrup.
- Let the solution rest. Cover the container and allow it to sit for at least four hours. Resting overnight often produces even better bubbles.
- Test the bubbles. Pour a small amount into a shallow container, dip in a wand and test the solution outside.
- Adjust if needed. If the bubbles pop immediately, let the mixture rest longer before changing the recipe.
Do not judge the recipe immediately: Freshly mixed bubble solution may produce weaker bubbles. Allowing it to rest gives the ingredients time to combine and usually improves the results.
Glycerin vs. corn syrup for bubbles
Both vegetable glycerin and light corn syrup can help slow evaporation and make bubble films more durable. You only need one of them.
| Ingredient | Advantages | Things to Know |
|---|---|---|
| Vegetable glycerin | Clear, effective and less sticky | May require a trip to a pharmacy or craft store |
| Light corn syrup | Inexpensive and often already available at home | Can leave hands and outdoor surfaces slightly sticky |
| No additive | Uses only soap and water | Bubbles may be smaller or pop more quickly |
Adding extra glycerin or corn syrup does not always make stronger bubbles. Too much can make the mixture heavy and difficult to blow, so begin with the amount in the recipe.
What dish soap works best for bubbles?
A concentrated liquid dish soap generally creates a stronger bubble film than an especially thin or highly diluted soap. However, formulas vary, so the exact amount may need a small adjustment.
Avoid heavily lotion-based soaps because moisturizing ingredients may interfere with the bubble film. If one soap produces disappointing bubbles, trying a different concentrated formula may be more effective than repeatedly adding more of the same soap.
Start with the basic ratio: Use approximately six parts water to one part dish soap. Test the rested solution before adding extra soap, glycerin or corn syrup.
Why distilled water can help
Ordinary tap water works for most homemade bubble recipes. However, water containing a high level of minerals may produce less flexible bubbles.
If your first batch consistently fails despite careful measuring and resting, try making the next one with distilled water. This is optional, not a requirement for every batch.
What can you use as a homemade bubble wand?
You do not need to buy a new wand every time one disappears. Many household objects with open holes can hold a thin film of bubble solution.
- Clean cookie cutters
- Silicone rings
- Slotted spoons
- Plastic funnels
- Clean fly swatters with holes
- Pipe cleaners twisted into loops
- Plastic berry baskets
- Straws joined into geometric shapes by an adult
Avoid sharp or breakable objects: Check homemade wands for pointed wires, cracked plastic and small detachable pieces before giving them to a child.
How to make a giant bubble wand
For giant bubbles, use two smooth sticks and a loop of soft cotton cord. An adult should assemble and operate the wand until children can use it safely.
- Cut one shorter piece and one longer piece of soft cotton cord.
- Tie the shorter cord between the ends of two smooth sticks.
- Tie the longer cord beneath it to create a loose loop.
- Dip the entire cord loop into a wide container of bubble solution.
- Lift the sticks together, then slowly separate them.
- Walk backward gently or let the breeze pull a large bubble from the loop.
Giant bubble tools require a wide, shallow container and plenty of open space. Keep long cords under direct adult control and put them away immediately after play.
Easy bubble activities for toddlers
Turn bubble play into an experiment
Ask simple questions while children explore. Do large wands always create large bubbles? What happens on a windy day? Do bubbles last longer in the sun or shade?
Children do not need a formal explanation. Predicting, testing and noticing results are the important parts.
Use bubbles for sensory play
Bubbles can be a useful option for children who enjoy watching and chasing sensory materials but dislike getting their hands messy. Start by blowing the bubbles for your child and let them decide whether they want to touch or pop them.
For more adaptable play ideas, explore our guide to mess-free sensory activities for toddlers.
Why is my bubble solution not working?
The bubbles pop immediately
Let the solution rest longer and try again in a humid, shaded area. Heat, dry air and strong wind can make bubbles evaporate and pop more quickly.
The mixture is extremely foamy
The solution was probably stirred or shaken too vigorously. Let it sit until the foam disappears, then dip the wand beneath the remaining bubbles on the surface.
No film forms across the wand
Make sure the entire wand opening is submerged. If the rested solution still will not form a film, gently add a small amount of dish soap.
The solution is too sticky
The batch may contain too much corn syrup or glycerin. Add a small amount of water and dish soap in the original ratio rather than adding water alone.
The bubbles are very small
Blow more slowly and use a larger wand. Strong, sudden breaths often create clusters of small bubbles or break the film entirely.
The giant bubbles keep collapsing
Make sure the cord is completely saturated and move the wand slowly. Giant bubbles are easiest to create in still or gently moving air rather than strong wind.
Weather matters: Bubbles often last longer on humid or overcast days because the water in the bubble film evaporates more slowly.
How to store homemade bubble solution
Pour leftover solution into a clean, clearly labeled bottle or lidded container. Store it upright and out of children’s reach.
The solution can often be reused for several weeks when it remains clean. Discard it if it becomes dirty, develops an unusual smell or contains visible growth.
Do not return used solution to the main container if children have been dipping dirty outdoor tools into it. Store only the clean, unused portion.
How to clean up bubble solution
- Rinse bubble wands and containers with clean water.
- Wipe spills promptly because soapy surfaces can become slippery.
- Rinse sticky corn syrup residue from patios and outdoor furniture.
- Wash children’s hands after play.
- Follow clothing care instructions if the soap leaves a mark.
- Store reusable tools only after they have dried completely.
If your children want another colorful outdoor project, make a batch of homemade sidewalk chalk paint.
Bubble solution safety
Bubble solution is not safe to drink. Dish soap can irritate the mouth, stomach and eyes. Supervise young children and store both the solution and concentrated ingredients out of reach.
- Teach children to blow out through a wand rather than suck inward.
- Use traditional wands for children who may place straws in their mouths.
- Keep the solution away from eyes and rinse accidental splashes with clean water.
- Clean spills immediately to prevent slips.
- Use bubble solution outdoors or on easy-to-clean flooring.
- Keep giant-bubble cords away from necks and put them away after use.
- Do not leave buckets or deep containers accessible to young children.
Frequently asked questions
What is the best ratio for homemade bubble solution?
A useful starting ratio is approximately six parts water to one part liquid dish soap. This recipe uses 2 cups of water and 1/3 cup of soap.
Do I need glycerin to make bubbles?
No. Water and dish soap can create bubbles on their own. Glycerin or light corn syrup may make the bubble film more durable and slow evaporation.
Can I use sugar instead of glycerin?
A small amount of dissolved sugar may help strengthen bubble solution, but it can make the mixture sticky. Light corn syrup is generally easier to blend into the recipe.
Why should bubble solution rest before use?
Resting gives the soap and strengthening ingredient time to disperse evenly and allows excess foam created during mixing to disappear.
Can toddlers blow bubbles safely?
Toddlers can use traditional bubble wands with close supervision. Avoid straw-style blowers for children who may suck the solution into their mouths.
Can I add food coloring to bubble solution?
It is usually unnecessary and may stain clothing, skin or outdoor surfaces. Clear bubble solution still creates rainbow-like reflections when light passes through the film.
Can homemade bubble solution be used in a bubble machine?
It may work in some machines, but homemade mixtures can differ in thickness. Check the machine’s instructions before using anything other than the recommended solution.
What weather is best for blowing bubbles?
Cool, humid weather with little wind often produces the longest-lasting bubbles. Hot sun, dry air and strong wind can cause them to pop quickly.
Make more homemade play recipes
This bubble solution is one of ten simple projects in our collection of DIY sensory and craft recipes for kids. The complete guide includes colorful paints, moldable doughs and sensory mixtures made from easy-to-find supplies.



Leave a Reply