
A cup monkey with wonderfully bendy arms
Toddler Monkey Craft with a Paper Cup and Accordion Arms
Paint a paper cup, build a layered monkey face, and fold two paper arms that stretch out for an extremely dramatic hug.

The arms are the whole point of this monkey. You can leave them folded close to the cup or open them into a ridiculous reach across the table. They are paper, so the monkey’s ambitions need to stay fairly modest.
This toddler craft monkey project has three separate jobs: paint the body, assemble the face, and fold the arms. Break those jobs into two sittings if wet paint and paper scraps are already competing for space. The cup stands upside down, giving you a broad rim for a base and a closed top to support the head.
Paint an eight-ounce paper cup brown and let it dry. Stand it rim-down, attach a cardstock-supported monkey head, then add two eight-inch paper strips folded into half-inch accordion pleats. Glue tan paper hands onto the free ends.
Supplies for one paper-cup monkey
Prepare the cut pieces while the cup dries.
- One plain eight-ounce paper cup
- One teaspoon of washable brown craft paint, plus a little extra if needed
- One paintbrush, a small paint dish, and a washable table covering
- One three-inch brown cardstock circle for the head
- Two one-and-a-half-inch brown paper circles for ears
- Two one-inch tan paper circles for ear centers
- One tan paper oval, two inches wide and one-and-a-half inches tall, for the muzzle
- Two brown lightweight-paper strips, eight by one inch, for arms
- Two one-inch tan paper circles for hands
- One brown cardstock support strip, three by one inch
- A glue stick, black crayon, ruler, pencil, and adult scissors
You do not need plastic eyes, pipe cleaners, or real banana props. Draw the eyes and mouth. Keep the head and support strip in cardstock; lightweight paper works better for the arms because it makes crisp folds without a wrestling match.

Set up the paint session first
Turn the cup upside down before painting. That way, its inside stays clean and your child can see the shape the finished monkey will have. Put the paint dish on the table covering and keep the face pieces elsewhere until the wet work is finished.
A thin coat is enough to begin with. More paint does not make the cup more monkey-like; it mostly makes the wait longer. If your cup has a shiny coating, test a small patch and check whether the paint stays put when dry.
The standing paper-cone duck starts with colored paper instead of paint. It is a handy companion to prepare while this cup is drying, especially if someone considers waiting an unreasonable craft requirement.
Build a body that supports the face
- Paint the cup in a thin coat.
Brush brown paint over the outside and closed base of the cup. Leave its wide rim resting on the covered table. Spread any thick blobs rather than adding more paint over them.
- Let it dry completely.
Follow your paint’s drying guidance and check an inconspicuous patch before assembling. The surface should feel dry, not cool and sticky. If the white cup shows through, add a second thin coat and give it another drying break.
- Make the ears.
Glue a tan center onto each brown ear circle. Attach the brown circles behind opposite sides of the three-inch head, leaving about half of each ear visible. Set the head flat so the ear joints can settle.
- Add the muzzle and drawn face.
Glue the tan oval across the lower half of the head. Draw two eyes above it, then nostrils and a smile on the oval. Leave space between the eyes and muzzle rather than trying to fit every feature into the same little patch.
- Attach the head support.
Glue the upper half of the three-inch cardstock strip onto the back of the head. Its lower half should extend below the head. This hidden strip carries the joint; the ears do not need to hold anything up.
- Fix the head to the cup.
With the cup rim-down, glue the lower half of the support strip vertically onto its front wall. Position the head so its bottom edge overlaps the cup’s closed top by roughly half an inch. Hold the strip against the dry cup until it grips.
Keep the head low. A long exposed support looks like a neck, but it also lets the head wobble whenever the arms move. The overlapping head and cup make a much sturdier little character.
For another paper face with a very different edge treatment, the paper-plate lion’s fringed mane is useful to compare. Here, the small layered ears do the framing, so you can keep the rest of the head uncluttered.
Fold two matching accordion arms
- Mark the first half-inch fold.
Lay an eight-by-one-inch strip flat and fold one short end back by half an inch. Use that first fold as your guide for the rest. You can mark intervals lightly on the back if uneven folds are making the strip curl sideways.
- Alternate the folds.
Flip the strip over and fold another half-inch section back in the opposite direction. Continue folding back and forth along its length. Press each crease before moving on, then repeat with the second strip.
- Reserve a flat attachment tab.
Open the first pleat at one end of each arm so you have a half-inch tab. Glue that tab to one side of the cup, just below its closed top. The remaining pleats point outward; do not glue the whole folded stack onto the body.
- Add the hands.
Glue a tan hand circle onto each free end. Let both attachment points set before opening the arms gently. Hold the cup with one hand and adjust the folds with the other instead of pulling the hand circles like handles.
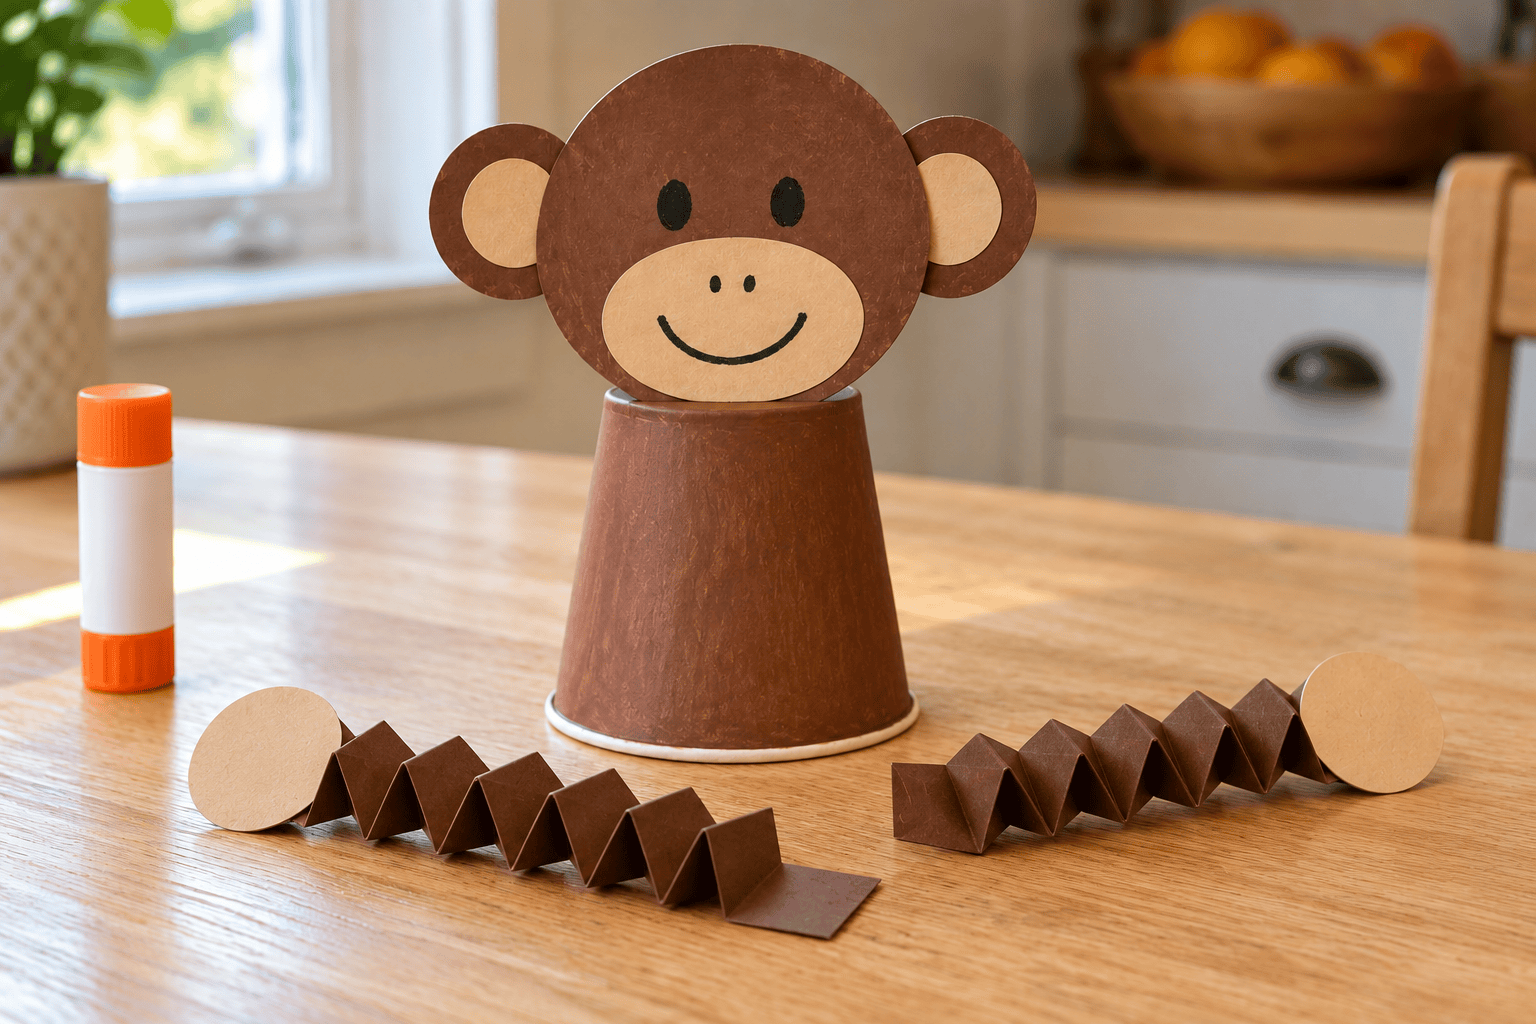
Let your child choose the arm positions. One tucked in and one stretched out gives the monkey a surprisingly bossy appearance. An accordion arm can change position, but repeated stretching will eventually soften the creases.
When the monkey needs a small repair
The paint rubs off
Check whether the cup’s coating is resisting it. Let the test patch dry fully; if it still flakes, use a matte paper cup instead. Adding glue over loose paint will not give the head a reliable attachment.
The head tips forward
Move it lower so it overlaps the cup top, and press the support strip flush against the wall. Use cardstock for that strip. A thin paper strip bends under the head’s weight.
An arm unfolds in a twist
Flatten the strip and remake the folds square to its long edges. Work from one end, matching the first pleat’s width. Alternating crooked folds makes a corkscrew instead of an arm.
The whole arm pulls off
Glue only the flat end tab and allow it to set before playing. If the painted surface is loose, repair the body first. Hold the cup during adjustments so the joint takes less strain.
The monkey rocks
Check the cup’s wide rim for a crushed section. Stand it on a flat surface and straighten that section gently. Keep decorations off the rim so paper scraps are not propping up one side.
A hand circle disappears
Cut another tan circle or draw a hand directly onto the final arm panel. The fold still works without a separate piece. Put unused small cutouts away before moving to play.
Give the monkey somewhere to sit
Set it on a bookshelf for display or beside a cardboard play scene. The shoebox dollhouse tutorial has ideas for simple rooms and furniture if your animals need an address.
For an animal that talks back, make the folded-paper dog with a moving mouth. The dog works on your hand while this monkey stands on the table, which makes their conversation easy to stage.
Three ways to change the same monkey
A sleepy monkey
Draw curved closed eyes and fold both arms close to the cup. Use the same pieces and joints; the expression changes without adding fiddly accessories.
A pair of short arms
Use four-by-one-inch strips and keep the half-inch folds. Shorter arms are easier to leave extended and less likely to catch neighboring crafts on a crowded table.
A paper banana to hold
Cut one broad yellow crescent and glue it onto a hand after the arm joint has set. Keep it light and flat. A real banana is considerably outside this paper monkey’s lifting capacity.
Paper-cup monkey questions
How do you make a toddler monkey craft with a paper cup?
Paint the cup brown, stand it rim-down, and attach a supported paper head. Add two accordion-folded paper arms with flat glued tabs. Let the paint and glue dry between stages so the attachments stay put.
What paper works for accordion monkey arms?
Lightweight craft paper folds more easily than thick cardstock. Cut both strips to the same width and make square, even pleats. Use cardstock for the head support instead.
Can you make the monkey without small plastic eyes?
Yes, draw the eyes with a black crayon. The nose and smile can be drawn on the tan muzzle too. You can also draw hand shapes directly onto the arm ends.
Why will the monkey head not stay upright?
A thin support or a head placed too high usually causes the wobble. Use the cardstock strip and overlap the head’s lower edge with the cup top. Check that the glue is attached to dry, secure paint.
Can you prepare this monkey craft ahead of time?
You can cut the pieces and paint the cup ahead, then store everything after it dries. Leave the face assembly and arm folds for your child to help with. Keep the small cutouts in a closed container until craft time.


Leave a Reply