
Make it at the table, test it in a breeze
Toddler Kite Craft: A Paper Bag Wind Toy
Turn a lunch bag into a small kite with a reinforced opening, balanced bridle, and tissue-paper tails. Expect fluttering and short lifts close to you, rather than a spectacular flight over the neighborhood.

A paper bag catches air surprisingly well when its mouth stays open. The catch is that the handle arrangement matters. Tie a long string to one flimsy corner and your toddler gets a spinning bag, followed by a perfectly fair complaint.
This toddler craft kite tutorial makes a short-tether wind toy from an ordinary lunch bag. Your child decorates the bag and chooses the tails. You reinforce the opening, make the holes, and tie a little two-point bridle that pulls from both sides.
Decorate a paper lunch bag, fold and tape its open rim, and make two opposite reinforced holes. Tie a short yarn bridle between them and attach an 18-inch tether at its midpoint. Add three lightweight tissue tails to the closed base and try it in a gentle breeze.
Supplies for one paper bag kite
No dowels, staple ends, or plastic shopping bags.
- One plain paper lunch bag, approximately five inches wide and ten inches tall when flat
- One 12-inch piece of yarn for the bridle
- One 18-inch piece of yarn for the hand-held tether
- Three tissue-paper strips, each one inch wide and 12 inches long
- About 12 inches of clear tape, cut into short pieces
- Crayons or washable markers
- Scissors and a single-hole punch, used by an adult
- A pencil for marking the hole positions
Choose lightweight paper with a bottom that opens into a little box. A thick gift bag may be pretty, but its weight and handles make this particular design awkward.

Decorate without weighing the bag down
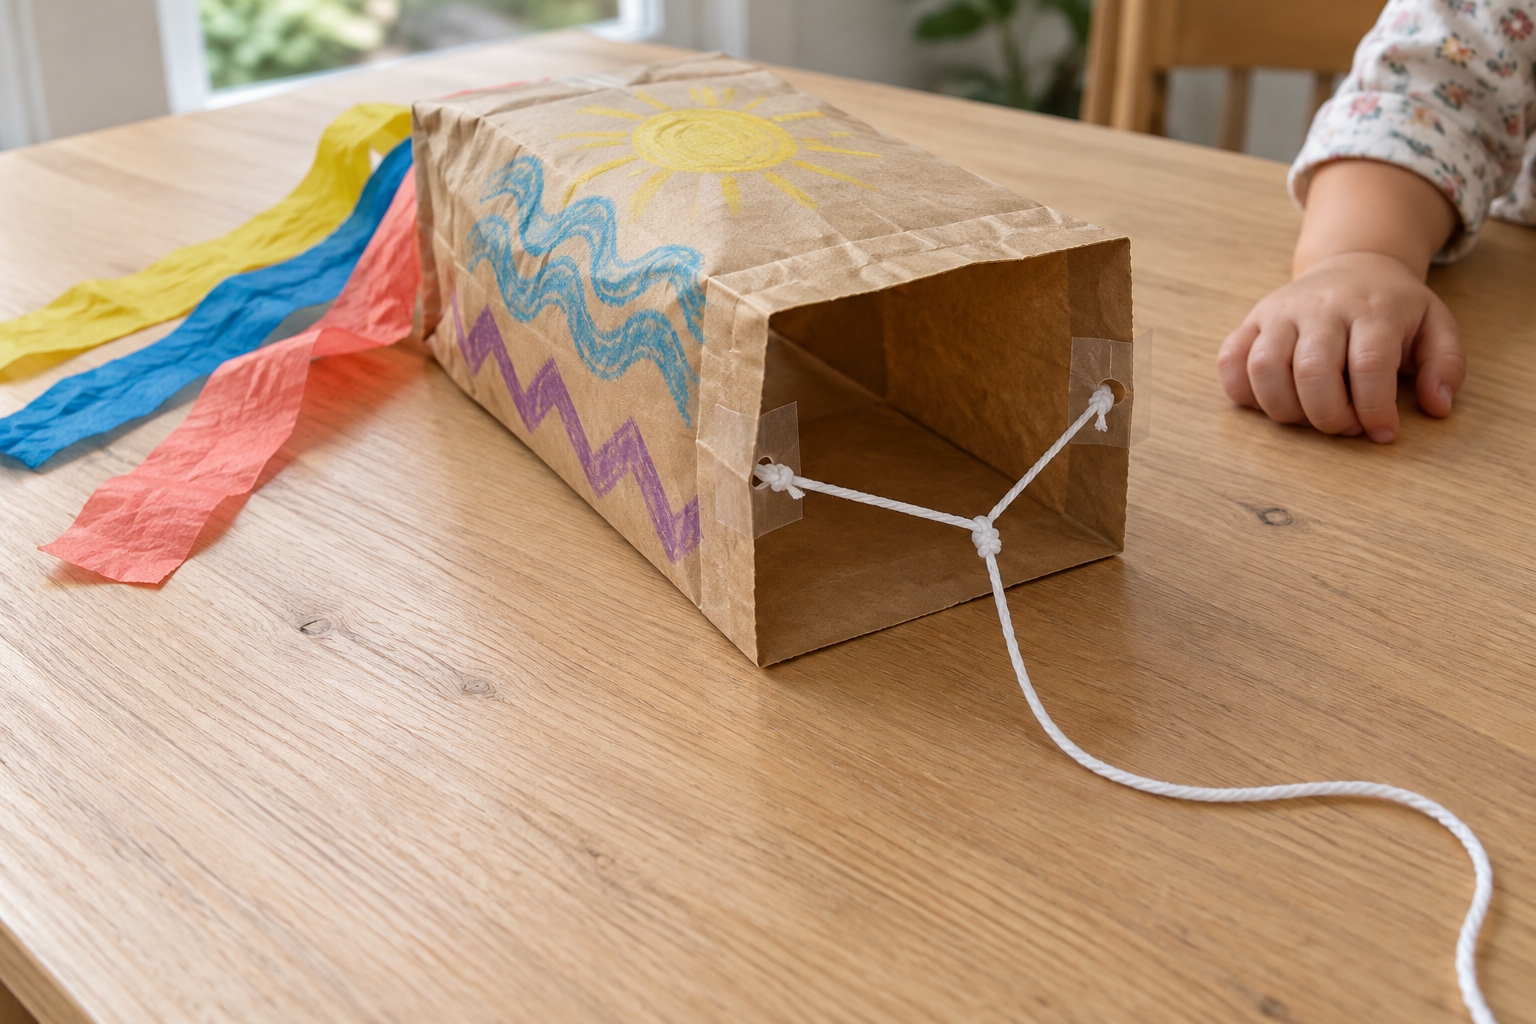
Keep the bag flat while your toddler draws on it. Blue waves, a yellow sun, and a purple zigzag are enough to make it feel like their creation.
Leave an inch of plain paper around the open end. You will fold that area into the rim, and crayon wax can make tape less willing to stick. Avoid glued-on buttons, pom-poms, and thick paint; the bag needs to stay light and open easily.
Cutting tissue tails leaves plenty of scraps. Save them in a cup for a tissue-paper suncatcher, where torn pieces belong. The kite’s tails work better as whole strips, since lots of joins add weight and catch on each other.
How to make the rim, bridle, and tails
- Open the decorated bag.
Put a hand inside and gently push out the bottom corners. The bag should form a small open box. Check the base seam before adding anything; a split seam lets the air escape and is easier to repair now.
- Fold the rim outward.
Fold the top half inch outward all the way around the opening. Work one face at a time, then pinch the corners. This doubles the paper at the edge without closing the mouth.
- Reinforce two opposite sides.
Choose two opposite faces of the bag. At the middle of each folded rim, place a short piece of tape over the edge so it covers the outside and inside. Press it smooth. These two taped spots are where the bridle will pull.
- Punch matching holes.
An adult punches one hole through each reinforced spot, about a quarter inch below the upper edge. The holes should face each other across the opening. Do not punch the thin corner folds or just one layer below the rim.
- Tie the two-point bridle.
Thread one end of the 12-inch yarn through one hole and tie it securely. Tie the other end through the opposite hole, leaving a loose bridge across the mouth. It must have enough slack that it does not squeeze the opening shut.
- Add the short tether.
Tie the 18-inch yarn to the middle of the bridge. When you lift the tether gently, both sides should pull equally and the bag’s opening should remain broad. Leave the free end plain; do not make a wrist loop or a loop that can go around your child.
- Tape on three tails.
Place the tissue strips on the outside of the closed base, opposite the opening. Tape each top end separately, spreading them along the base rather than stacking them in one heavy bunch. Yellow, blue, and coral tails make it easy to spot which strip is snagged.
- Do a gentle table test.
Hold the free tether end and lift the bag a little. Look for equal tension, loose knots, and a rim that folds inward. Put it down and fix those now.

Take it outside without promising a launch
Choose a clear, dry patch of open space with a gentle breeze. An adult can hold the bag’s open mouth toward the breeze while your toddler holds the short free end beside you. Release the bag gently when it begins catching air.
It may puff up, swing, skim along, or lift briefly. A lunch-bag kite has neither the shape nor the long flying line of a conventional kite. The fun is watching its tails react, then changing one small thing and trying again.
Walk slowly together if there is very little wind. You do not need a running child attached to a homemade object. Stop if the bag drags or your toddler starts pulling hard; inspect it and reopen the mouth before another attempt.
If outdoor testing gets rained out, an accordion umbrella card keeps the weather theme going at the table. Its canopy needs carefully pressed folds, while this kite needs a loose, open bag.
Small fixes before you abandon the bag
The mouth keeps collapsing
Check that the bridle is loose enough. Retie one end to give the bridge more slack, then reshape the folded rim with your fingers. A tight bridge pulls the two faces together and stops air entering.
The kite spins sideways
Move the tether knot toward the bridle’s midpoint and check that the holes are at matching heights. Separate tangled tails. Test again before adding anything heavier to “balance” it.
A hole starts tearing
Stop pulling immediately. Tape both sides of that section, then make a fresh hole in intact reinforced paper nearby. If the tear reaches the rim corner or keeps growing, transfer the decorations to a new bag.
The tails will not flutter
Remove extra tape, glued decorations, or damp tissue. Replace a stiff tail with a single lightweight strip. Make sure the three strips hang separately and are not taped along their full length.
It just hangs there
Try another gentle breeze with the mouth facing into it. Check for a leak in the base and remove heavy decorations. Some conditions will still produce only a swinging wind toy; save a flying attempt for another day.
The bag gets damp
Bring it inside and let it dry without pulling the tether. Damp paper tears easily. If the bottom loses its shape, keep the drawing as artwork and build the next kite from a fresh bag.
Help your toddler make a change they can see
Save the remaining yarn for a small cardboard loom. Yarn can be pulled and tucked there; this bag needs its knots to stay put. The projects share supplies without sharing instructions.
Three ways to personalize it
A face on the bag
Draw two large eyes and a mouth with crayon. Keep the face on one broad panel so it is visible when the bag opens. Paper ears and glued noses are tempting, but they can wait for a separate puppet craft.
A two-color tail test
Use two strips first, then add the third. Watch how much they tangle and whether the bag turns differently. Keep their length the same so you are not changing several things at once.
Adult-held wind watching
If your child would rather watch, you hold the tether and let them point out the moving colors. There is no requirement to hand over the yarn. They can still choose the decorations and call the kite something wildly unrelated.

Put it away without crushing the opening
Unhook any tangled tails and keep the kite on a shelf with its mouth open. An adult puts the tether out of reach between sessions. Once the bag is too crumpled to reopen, recycle the paper after removing tape and yarn as your local collection requires.
Your toddler can record the rainy half of the weather story with a wax-resist rain picture. That project uses paint, so finish it on a different tray rather than letting a wet brush wander onto the kite.
Paper bag kite questions
Will a paper bag kite really fly?
It can catch a breeze and lift briefly, but this short-tether design is mainly a fluttering wind toy. It will not perform like a conventional framed kite. Keep the first test modest so a bag that simply puffs up still feels interesting.
Why do I need two holes instead of one?
The two-point bridle spreads the pull across opposite sides of the mouth. One attachment can tilt the bag and tear that corner. Keep the bridge slack enough to leave the opening open.
Can I use a plastic bag for this kite craft?
Use a paper lunch bag for this project. Its folded rim and taped holes suit the method described here. A plastic shopping bag needs a different approach and is not an interchangeable supply.
Can my toddler paint the kite?
A thin layer may work once completely dry, but crayons are lighter and quicker. Wet paint softens the bag, and heavy layers can make it harder to lift. Make a painted picture separately if your child mainly wants a brush.
Do I need a printable kite template?
No template is needed for a paper bag kite. The bag provides the shape; you measure the yarn and tissue strips. Your toddler can draw directly on the paper rather than cutting out a kite silhouette.
Leave a Reply