
Over, under, repeat
How to Make a Cardboard Weaving Loom for Preschoolers
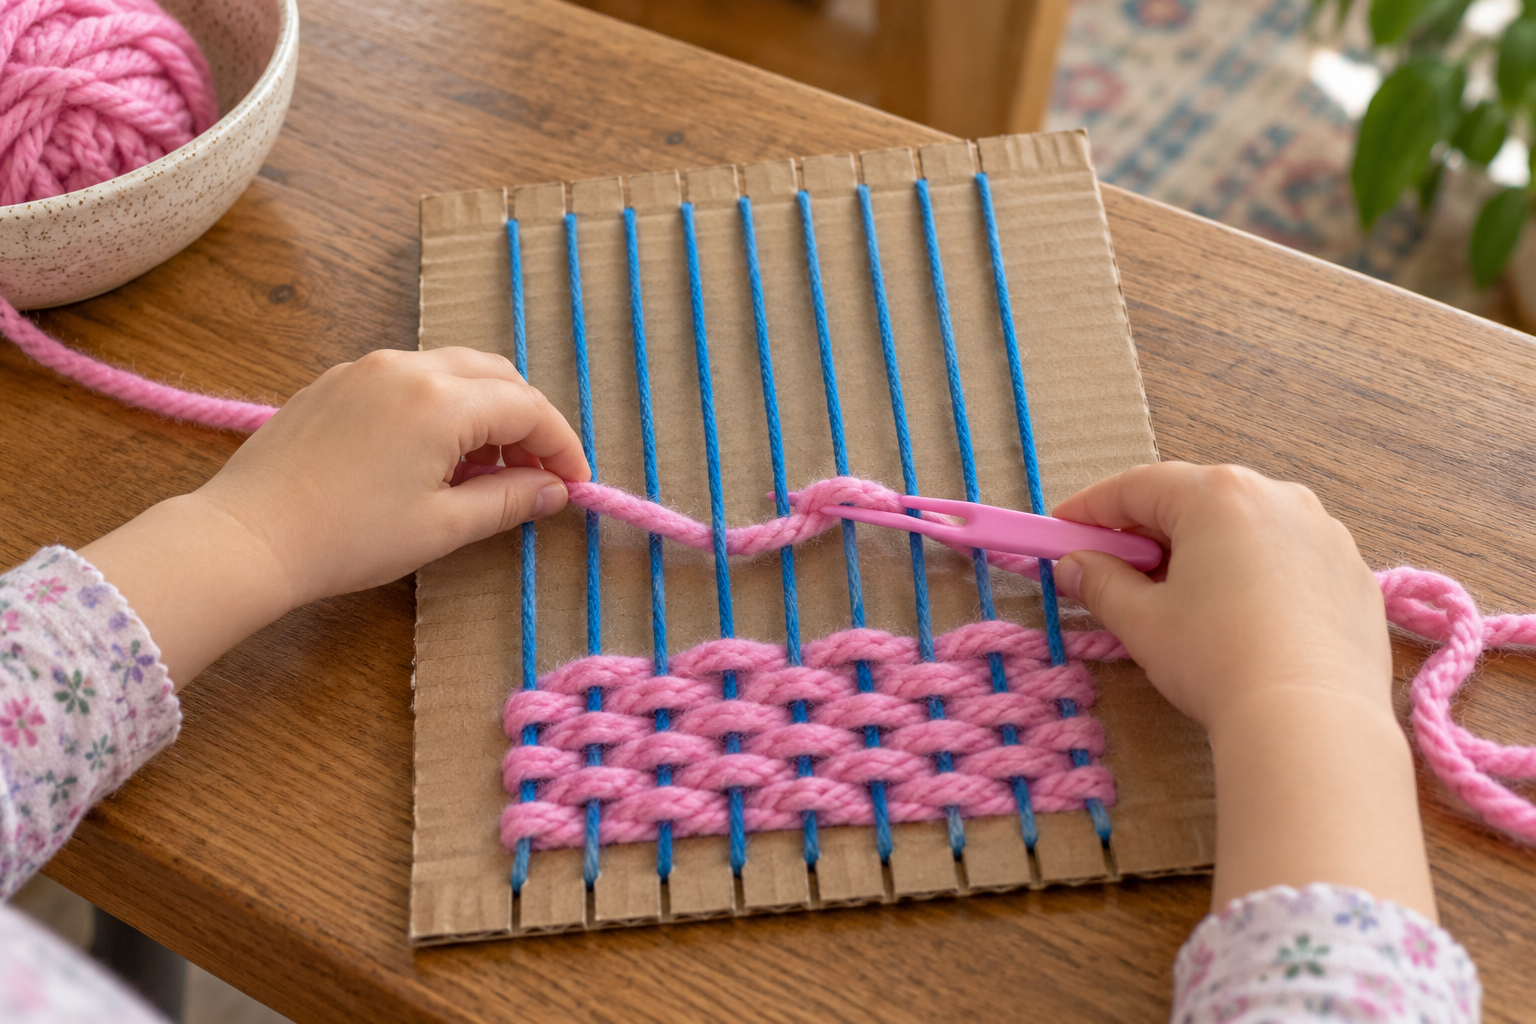
Nine vertical strands, one piece of cardboard, and a lot of over-under. This is the sturdy little loom that survives a preschooler pulling the yarn just a bit too hard.

A cardboard loom sounds like a project that requires a craft degree. It does not. You cut notches in a box, stretch yarn between them, and show your preschooler the two magic words: over, under. Then you get to watch a strip of yarn turn into something that looks surprisingly like fabric.
For a menu of smaller projects before committing to yarn, the low-mess toddler crafts roundup is handy. The first few rows can be a tangle but this tutorial gives you a loom sturdy enough to survive enthusiastic hands, plus an easy way to fix the rows that climb toward the top.
Choose chunky yarn and a wide plastic needle, not thin embroidery thread. Larger gaps let your child actually see where the yarn is supposed to go. If your child would rather make something wet and squashy today, the baking soda clay ornaments offer a different kind of slow project while this loom waits on a shelf.
Cardboard Weaving Loom for Preschoolers
One reusable loom and one colorful woven panel.
Materials
- 1 piece sturdy corrugated cardboard, about 8 by 10 inches
- About 3 yards thick yarn for vertical strands
- About 8 yards thick yarn in 2–3 colors for weaving
- 2 short pieces of masking tape
Tools
- Ruler and pencil
- Adult scissors or craft knife for preparing cardboard
- Wide, blunt plastic yarn needle, optional
- Small comb or fingers for nudging rows together

How to make a cardboard loom
- Choose the cardboard. Cut an 8-by-10-inch rectangle from a sturdy shipping box. Face the corrugated lines vertically if possible; the top and bottom edges hold notches better that way. An adult should do this cutting before the yarn comes out.
- Mark the notches. Along the short top edge, make nine pencil marks about three-quarters of an inch apart, leaving a margin at both sides. Put matching marks directly opposite on the bottom edge. Your lines do not need to be ruler-perfect, but the pairs should face one another.
- Cut shallow slots. An adult cuts each mark about half an inch deep. A slot should grip yarn without splitting the board. If one tears, reinforce that corner with masking tape and cut a new slot just beside it.
- String the vertical yarn. Tape one yarn end to the back. Bring it through the first top notch, down the front, through the matching bottom notch, then up the back to the next top notch. Continue across. These front-facing strands are the warp.
- Check the tension. Each vertical strand should lie straight but not bow the cardboard. Gently pull loose sections from the back and tape the end there. You have made the loom; pause for a tiny victory dance if your child insists.
- Start the weaving yarn. Cut a piece about an arm’s length long. Thread it through the blunt plastic needle or wrap the tip with tape so it is easier to hold. Tie its end loosely to the first vertical strand near the bottom.
- Go over, then under. Guide the weaving yarn across all nine vertical strands, alternating over one and under the next. At the edge, turn back without yanking tight. On the return row, go under the strands you went over last time.
- Settle each row. Push the finished row gently toward the bottom with your fingers or a small comb. Keep the rows snug but not crushed together. If the sides pull inward, loosen the last pass and leave a small curve of yarn at the turning edge.
- Change colors and finish. Tie on a new color at the side and keep weaving. For a simple child-made wall piece, leave the woven panel on the cardboard. Tuck loose yarn tails to the back and tape them flat.
If the cardboard offcuts are calling your child, the cardboard tube ball drop uses the scraps for a completely different build. The project works best when you do the setup and let your child own the weaving. A child who wants to stop after three rows has still woven three real rows. Park the loom somewhere safe and pick it up after snack; there is no wet paint waiting for you.
What “over, under” actually looks like
Watch the first two rows from the side. The weaving yarn should cross in front of one vertical strand, then disappear behind the next. On the return trip the pattern flips. If every row follows the exact same path, the yarn stacks in vertical channels instead of making a stable woven surface.
For a beginner, point at the next gap rather than reciting instructions from across the table. Your child can poke the blunt needle through a gap and pull the rest of the yarn after it. The tail should be short enough to manage; a ten-foot length becomes a floor-length knot by row two.
If your child enjoys that slow reveal of a pattern, you can try the scratch-art paper later. There the color is hidden until you scrape; here the pattern appears as each row crosses the last one.
Troubleshooting a cardboard loom
The board bows
The vertical yarn is too tight. Peel up the tape on the back and ease the yarn a little before taping it down again. A second cardboard layer glued to the back can stiffen a flimsy board.
My child’s yarn keeps tangling
Cut the working yarn to roughly an arm’s length. Put the yarn ball in a bowl on the table instead of letting it roll onto the floor. Untangle at the edge before starting another row.
The sides pinch inward
The weft is being pulled too hard at each turn. Undo the most recent row and leave a relaxed little arc around the outside strand. Gently spread the vertical strands back to their original spacing.
Rows look uneven
Use fingers to push the low rows down and lift the crowded ones. Uneven rows are fine for a child-made piece; fix only the gaps that make the weaving fall apart.
Ways to make it theirs
Big toddler version
Use a smaller cardboard rectangle with just five wide vertical strands. Skip the needle and let your child push a short, thick yarn piece through with fingers. The adult can help at the turn.
Seasonal stripes
Choose two yarn colors for a simple repeating stripe. Change colors every two or three rows and knot the tails along the side. The first color change is usually the moment the whole thing starts looking like a planned project.
Fabric-strip weaving
Cut narrow strips from an old clean cotton T-shirt and use those as the horizontal material. Keep the strips fairly even so they can pass through the warp. This makes a chunkier texture without adding tiny pieces.
Can you take the weaving off the loom?
You can, but the simplest preschool finish is to leave it attached and display the cardboard panel. If you want to remove it, an adult can cut the vertical yarn on the back, then tie adjacent front strands together in pairs at the top and bottom before lifting the panel. Do that slowly on a table; unknotted warp ends unravel.
For a cozy pretend room to hang this tiny textile in, the shoebox dollhouse tutorial includes a two-room layout and cardboard furniture. A little woven rectangle makes a great dollhouse rug, although you may need to choose a smaller loom size first.
Unlike making recycled paper at home, this project can be put away halfway through and resumed without waiting for anything to dry. Tape the working needle to the back so it does not vanish into the mysterious place where all craft supplies go.
Frequently asked questions
What age can try a cardboard weaving loom?
Many preschoolers enjoy a wide-spaced loom with chunky yarn and help at the edges. Younger toddlers may prefer pushing short fabric strips through five big gaps. Match the setup to how your child handles the materials and stay alongside them.
Can you weave without a plastic needle?
Yes. Wrap a small piece of tape around the end of thick yarn to make a firm tip, or use your fingers. Keep each working length short so it is easy to pull through.
How far apart should the cardboard notches be?
About three-quarters of an inch works well for thick yarn on an 8-inch-wide board. Wider spacing is easier for first-time weavers. Keep the slots shallow so they grip the yarn without weakening the cardboard.
Why does my weaving keep shrinking at the sides?
You are probably pulling the yarn tight when you turn around the outer strand. Ease that row back and leave a small loop at the edge. The finished width should stay close to the original space between outer vertical strands.
Can I reuse the cardboard loom?
Yes, if you leave the woven piece attached until you are ready to remove it and the notches stay intact. Reinforce worn edges with tape. A fresh cardboard rectangle takes only a few minutes if the first one gets bent.





Leave a Reply