
Tear, soak, scoop, dry
How to Make Recycled Paper with Kids
Old school notices, water, and a mesh screen become real paper your child can draw on. The trick is an even pulp layer and plenty of blotting before you lift it.

There is a particular kind of preschool joy in turning the paper you were about to recycle into paper again. The blender gets the big reaction, but the real trick happens later, when a soggy screen somehow becomes a sheet you can draw on.
This is a small-batch method for a kitchen table, not a craft-room machine. You tear, soak, blend, scoop, press, and wait. The waiting is the hard part if your child is already asking for a crayon. Make the sheets one day and plan to decorate them the next.
Use plain, uncoated scrap paper. For the broader pantry-and-craft-shelf lineup, the DIY sensory and craft recipes page collects other materials you can make at home. Old printer pages and the blank backs of school notices are good candidates. Save glossy catalogs and waxy packaging for the recycling bin; they make lumpy pulp that does not bond well. If you’re looking for another project where the wet stage and the finished stage feel completely different, our paper mâché bowl has that same surprise, with a three-dimensional result.
Small-Batch Recycled Paper
Enough pulp for about four postcard-size sheets, depending on thickness.
Materials
- 8 sheets plain, uncoated letter-size scrap paper
- About 4 cups warm water for soaking
- 2 more quarts water for the tray
- 1 teaspoon torn colored tissue paper, optional
Tools
- Large bowl and kitchen blender used by an adult
- Shallow tray about 9 by 13 inches
- Flat fine-mesh screen about 5 by 7 inches, mounted in a sturdy frame
- Two absorbent towels, two pieces of plain cotton cloth, sponge
- Spatula or old plastic card for lifting edges

How to make recycled paper with kids
- Tear the scrap paper. Rip eight sheets into pieces roughly the size of postage stamps. Exact size does not matter; smaller scraps soften faster. Give your child a bowl to collect the pieces so you are not chasing them across the floor.
- Soak it. Cover the scraps with about four cups of warm water. Leave them at least 20 minutes, or longer if you are using thicker paper. When a piece falls apart easily between your fingers, it is ready for the blender.
- Blend the pulp. An adult transfers about half the soaked paper and enough soaking water to cover it into the blender. Blend in short bursts until it looks like loose oatmeal with no hard paper corners. Repeat with the rest. Keep little hands away from the blades and unplug the blender before scraping it out.
- Fill the tray. Pour about two quarts of water into the shallow tray and stir in the pulp. The mixture should be watery enough for the fibers to float apart, rather than sitting in a solid mound. If it looks like porridge, add more water.
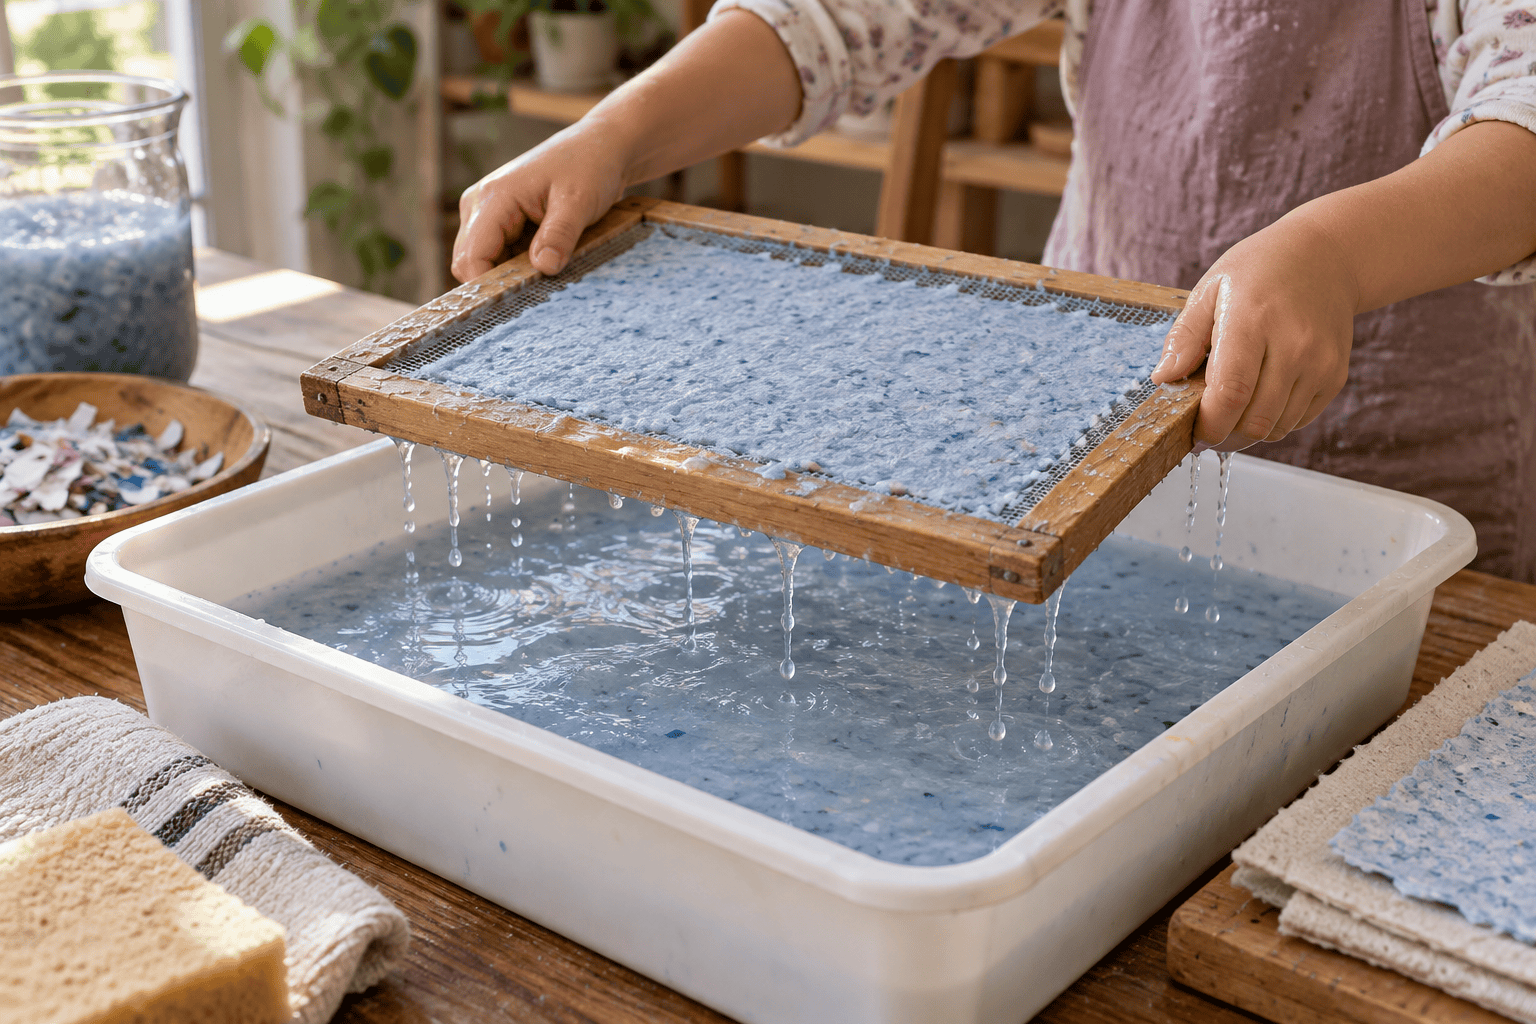
- Catch a sheet. Hold the framed screen level, slide it beneath the floating fibers, and lift it straight up. Let excess water drain over the tray. Your child can watch the scattered bits meet and form one layer. If there is a bare corner, dip again rather than piling pulp on top with your fingers.
- Press without rubbing. Place a cotton cloth over the wet pulp and dab firmly with a sponge. Turn the screen and cloth onto an absorbent towel, mesh side up, then press again. Blotting removes enough water for the sheet to release; rubbing pulls the fibers into streaks.
- Release the paper. Lift one corner of the screen slowly. The pulp should stay on the cotton cloth. If it clings to the mesh, set the screen back down and blot a little more. Do not tug a wet corner; it tears faster than you think.
- Dry flat. Leave the new sheet on its cloth on a dry towel. Make another sheet with the remaining pulp, stirring the tray before every scoop. Allow 24–48 hours of drying, depending on thickness and room humidity. Peel dry paper off the cloth gently and weigh it under a book overnight if it curls.
The first sheet is often the practice one. A first sheet may look like a map of islands if the frame lifts at an angle. It can still accept a crayon drawing. Your child is unlikely to file a quality complaint with the paper mill.
How thin should the pulp layer be?
A thin, even veil over the mesh makes paper you can bend. If you can barely see the screen through the wet fibers, you are in the right neighborhood. A thick mound dries slowly and may feel more like flexible cardboard. A patchy layer with obvious holes can be dipped again while it is still on the screen.
Color is easiest to control after you master the plain version. A teaspoon of torn tissue paper blended with white scraps gives a soft tint; a large handful can create soggy color clumps. For a different kind of colorful wet-to-dry reveal, the tissue paper suncatcher skips pulp entirely and belongs on a window.
Troubleshooting the paper
It breaks when I lift it
It is usually too wet or too thin. Return the screen to the cloth, blot several more times, and lift from a different corner. For the next sheet, add another small scoop of pulp to the tray.
The sheet is chunky
Blend the next batch longer with extra water. Remove any pieces of glossy or coated paper that refuse to break down. Chunky paper can still be used for a card if it dries fully.
It sticks to the screen
Press the cloth firmly against the pulp, flip the whole sandwich, and blot through the mesh. Start peeling the screen at a shallow angle. A tight, clean screen releases more easily than saggy mesh.
It curls or stays damp
Move the cloth to a dry towel and give the sheet more air. When completely dry, put it beneath a heavy book overnight. Do not stack damp sheets; they can stick together.
Three ways to change the batch
Confetti flecks
After blending the main pulp, stir in a teaspoon of very small colored paper pieces. You will see distinct specks instead of an all-over tint. Keep them tiny so the sheet holds together around them.
Postcard size for younger helpers
Use a smaller screen and let your child do the tearing, stirring, and sponge pressing. An adult can manage the watery lift. Small sheets are easier to transfer and fit nicely on a refrigerator door.
Pressed leaf impression
Place one flat, clean leaf on the wet sheet just before the final blot. Press lightly and remove it after the paper is dry. It leaves a faint impression; it does not need to be glued into the paper.
What to do with the finished sheets
Once dry, your child can draw on the paper with crayons or make a card. Ink pens may feather on rough fibers, so test in a corner. If your child wants a smoother surface for a picture, the painter’s tape watercolor project starts with ordinary paper and gives crisp color blocks. The handmade edges are half the charm; there is no reason to trim every sheet into a perfect rectangle.
Keep leftover wet pulp only for the same craft session. Pour the tray through a sieve or old screen, put the captured pulp in the trash, and then rinse the tray. Sending thick pulp straight down the drain is a good way to turn a pleasant craft into plumbing homework.
Our cardboard weaving loom gives you another slow-build project without a drying rack. When you want to use one of those finished sheets for something, a tiny framed drawing can decorate the shoebox dollhouse. Let the sheet dry fully before putting it against cardboard.
Frequently asked questions
Can I make paper without a blender?
Yes, but it takes longer. Soak the torn paper overnight and mash it hard with a potato masher until the pieces are very small. Expect a coarser, thicker sheet than the blended version.
What kind of scrap paper works best?
Plain uncoated printer paper is the easiest starting point. Newspaper can work, but it makes gray paper and may leave ink on hands. Avoid glossy magazines, plastic-coated mailers, and waxed paper.
Why is my homemade paper falling apart?
The fibers may be too sparse on the screen, or the sheet may still be very wet when you transfer it. Add a bit more pulp, lift the screen level, and blot thoroughly before peeling. Let it dry completely before drawing.
How long does handmade paper take to dry?
Thin sheets often need about a day; thick ones can take two days or longer in a humid room. Check that both sides feel dry and firm before stacking them. A fan across the room can help air move, but do not blast the wet sheet off its cloth.
Can I use food coloring in the pulp?
You can, but it may tint hands, towels, and the tray. Torn colored tissue paper gives a gentler effect with less liquid dye to manage. Test any color on a small batch first.





Leave a Reply