
A place for the crayons, and a place for the finished turkey
How to Set Up a Thanksgiving Kids’ Activity Table

Set out one coloring page and a few crayons at each place. Keep the optional craft kits with an adult, clear a separate landing area for artwork and have an adult stay with the table. Close and clean the activity before food is served.
The useful part of a Thanksgiving kids’ activity table is the bit you can reach from a chair. Give each child a clear working space, keep the first activity simple and put the extra supplies somewhere an adult can fetch them.
This setup is for four preschool-age children at a separate activity table: coloring when they arrive, then an optional paper turkey collage with an adult beside them. It is not a promise of uninterrupted cooking time. With two young kids of my own, I would rather plan for company at the table than discover that everyone needs help while I am holding a hot baking dish.
For two children, halve the supplies. Start with the chairs and working space you actually have; the table does not need to look like a miniature wedding reception.

From the Feral Toddler Etsy shop
Choose the paper activities before setting the table
The Thanksgiving crafts bundle is available in the Feral Toddler Etsy shop. Use the corn mosaic as an arrival page and prepare an optional turkey collage from the same collection, without setting out all sixteen projects.
Buy the bundle on EtsyStart with chairs, not decorations
A rectangular table around 48 × 30 inches is a workable starting point for four small places, two on each long side. Put the actual chairs around it and check that children can sit with room for their knees. Check working space as well as seating.
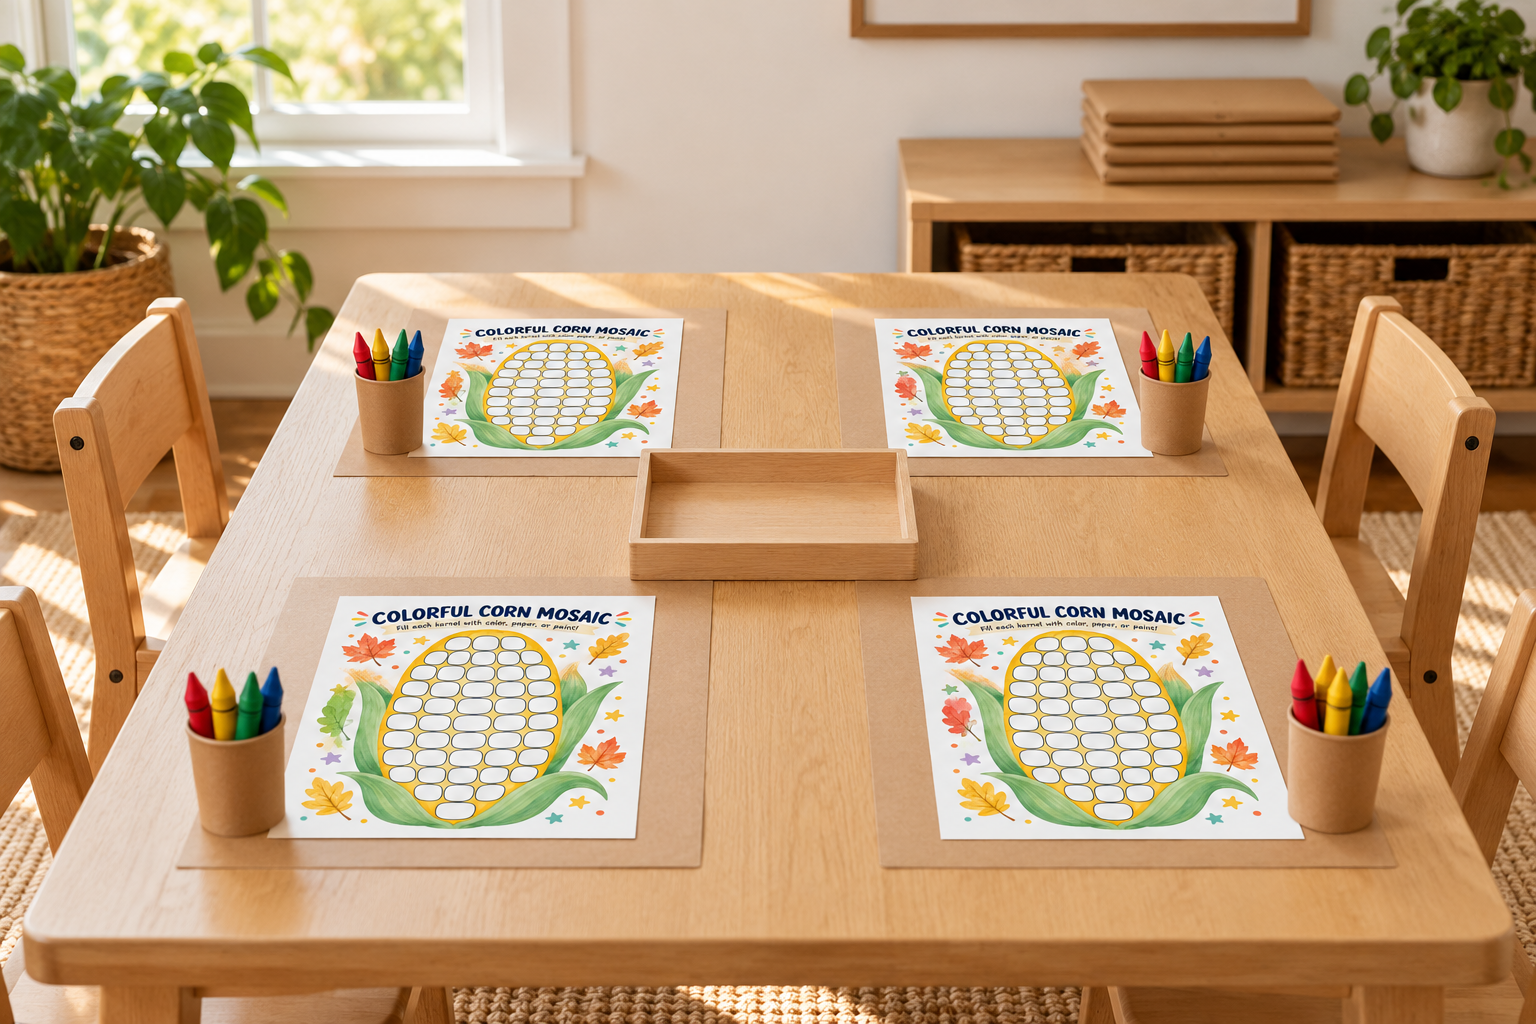
Try four paper mats about 16 × 12 inches. Turn each mat so its 16-inch edge follows the long side of the table; two mats on each side leave a narrow strip through the middle. A letter-size page fits on each mat, with room beside it for a small crayon cup.
Keep the middle low and mostly empty. Put the next craft, spare pages and adult scissors on a nearby shelf or sideboard. You want to reach the table from an open end without leaning over someone’s artwork. Check walking space behind the chairs, including the route to the kitchen.
A four-child Thanksgiving table kit
One easy arrival activity, one optional craft and somewhere for finished work.
- 4 paper mats, approximately 16 × 12 inches, plus a washable table covering if needed
- 6 copies of the Colorful Corn Mosaic page: 4 to start, 2 spares
- 4 cups with 4–5 crayons each; choose chunky crayons suitable for the children
- 4 prepared turkey-collage envelopes and 4 plain backing sheets
- 4 glue sticks, kept with the second activity until needed
- 1 shallow supply tray and 1 clearly separate scrap-paper container
- 4 dry landing spaces on a nearby shelf, plus a pencil for names
- Paper towels, a wipe cloth and a rubbish bag kept with the adult supplies
Allow roughly 30–45 minutes to prepare and arrange everything. Expect about $5–12 in paper, printing and consumables for four, excluding the paid printable and furniture or tools you already own; your ink use will change the total.

Choose an arrival activity you can explain in one sentence
Put out the corn page and crayons first: “You can color the spaces in the corn.” The printed artwork already has its colorful border, so the activity can stay entirely flat. Skip loose kernels, beans, glitter and wet paint for this hosting version.
The second activity is optional. Prepare one turkey set per child using our printable Thanksgiving craft guide, which covers choosing the pages and sorting the cutouts. This table guide handles where the supplies go, when to offer them and how to get finished projects off the working surface.
Keep envelopes, glue and spare pages off the table initially. A preschooler can open a beautifully packed project in the time it takes you to say, “That one is for later.”
Set up the table in the order you will use it
- Choose the supervising adult. Decide who will sit or stand beside the group while supplies are out. If another adult is cooking or greeting guests, say that clearly. If you are on your own, choose an arrangement you can stay with and postpone anything needing detailed help.
- Test one complete place. Sit a chair at the table, lay down a mat and add the coloring sheet and crayon cup. Check that the paper stays on the surface and the cup does not block the child’s arm. Repeat only after this first place works.
- Set up the landing area. Clear four flat spaces on the sideboard before anything gets glued. Put a small name slip beside each space, or pencil the child’s name on the back of their backing sheet. Keep these spaces away from the food-serving area.
- Arrange the arrival supplies. Place one corn page and a few crayons at each seat. Keep two spare pages in the adult tray. Offer seats as children arrive instead of beginning with a group instruction that late arrivals will miss.
- Offer the collage to children who want it. Clear finished coloring pages into their landing spaces. Bring out the relevant envelope, backing sheet and glue stick for each interested child. Someone who wants to keep coloring can stay with that activity.
- Refill one thing at a time. Give a fresh page or another crayon when needed rather than emptying the supply tray onto the middle. Keep small cutouts with their own envelope so one child’s turkey does not acquire everybody’s feet.
- Close the activity before food. Cap and collect glue sticks, sweep scraps into the separate container and move artwork to dry. Remove the covering if this table will become a dining table, clean the surface and have everyone wash their hands before eating.

Plan for children finishing at different times
You do not need a second scheduled project for every possible minute. Let a finished child draw on a fresh sheet, show their picture to another adult or leave the table with their caregiver. Keep the next activity optional rather than turning dinner into a craft rotation.
For Christmas, a structured making session needs a different plan for supplies and drying. The Christmas craft table setup uses an adult assembly point and flat drying boards instead of simply leaving several craft choices in the middle.
If only one child wants paper activities, set up a single place beside the supervising adult.
Fix the things that interrupt the afternoon
Everyone reaches across each other
Move frequently used crayons into individual cups and put the supply tray at an adult-accessible end. Remove the centerpiece or extra kits before buying a larger caddy.
There is nowhere for wet work
Pause the glue activity until you clear a flat space. Carry each piece on its backing sheet with both hands; do not stack fresh collages or slide them into envelopes while damp.
The younger guests want to join
Give them an age-appropriate coloring place with their caregiver, without the loose collage pieces. Adjust the actual materials and supervision rather than assuming the four-child kit suits every guest.
The food has to use this table
Choose a definite finish before serving and keep one box ready for dry supplies. Move the craft materials completely, clean the table and set it for food afterward; do not squeeze serving dishes between glue sticks.
Three versions that still feel manageable
Two-child kitchen-corner setup
Use two mats, eight crayons and two activity sets. Keep the spare pages on a shelf and choose coloring only if the table must be cleared quickly. Fewer places should mean fewer supplies, not twice as many projects per child.
Coloring-only gathering
Leave the glue and envelopes put away and offer the corn page plus blank paper. This is the simplest version to close before dinner. Our low-mess craft collection has other projects for a separate afternoon.
A place for paper pictures to become cards
After the gathering, save a small dry drawing for the front of a card, if your child wants to send one. For a different deliberate card project, try our heart-bouquet thank-you cards.
Supervise throughout; a table of supplies is not unattended childcare. Keep scissors and small offcuts with the adult, use age-labeled materials and separate real food from glue and paper crafts. Skip candles, hot drinks and trailing decorations around the children’s working area.

Reset the useful supplies afterward
Throw away glue-covered scraps, return dry cutouts to their own envelopes and put caps back on every glue stick. If you want a longer-term home for mixed activity sheets, the preschool activity binder tutorial separates fresh pages, loose making sheets and finished work so the holiday leftovers do not become a mystery pile.
Thanksgiving kids’ table questions
What should I put on a Thanksgiving kids’ activity table?
Start with a coloring page and a few crayons at each place. Keep glue, extra craft kits and cutting tools with the supervising adult until they are needed.
How much space does each child need?
Test the actual chair, mat, paper and crayon cup together before adding more places. A 16 × 12-inch mat is a useful starting footprint, but the child also needs room to sit, move their arms and get out comfortably.
Can the activity table double as the dinner table?
Yes, if you finish and remove the craft materials first. Clean the surface and have the children wash their hands before bringing food to the table.
Do all the children need to make the same Thanksgiving craft?
No, the arrival coloring page and optional collage can run side by side. Separate project envelopes let you bring out one child’s pieces without covering everyone else’s space.
Can I leave preschoolers crafting while I cook?
This setup assumes an adult stays with them. If you cannot supervise the table, close the activity and have another caregiver take over rather than leaving cutting tools, glue or small pieces out.



Leave a Reply