
One plate, two jobs for the cutout
Toddler Fish Craft with a Paper Plate and Tissue Scales
Cut one wedge for the mouth, use it again for the tail, and cover the body with big overlapping tissue pieces. No tiny scales required.

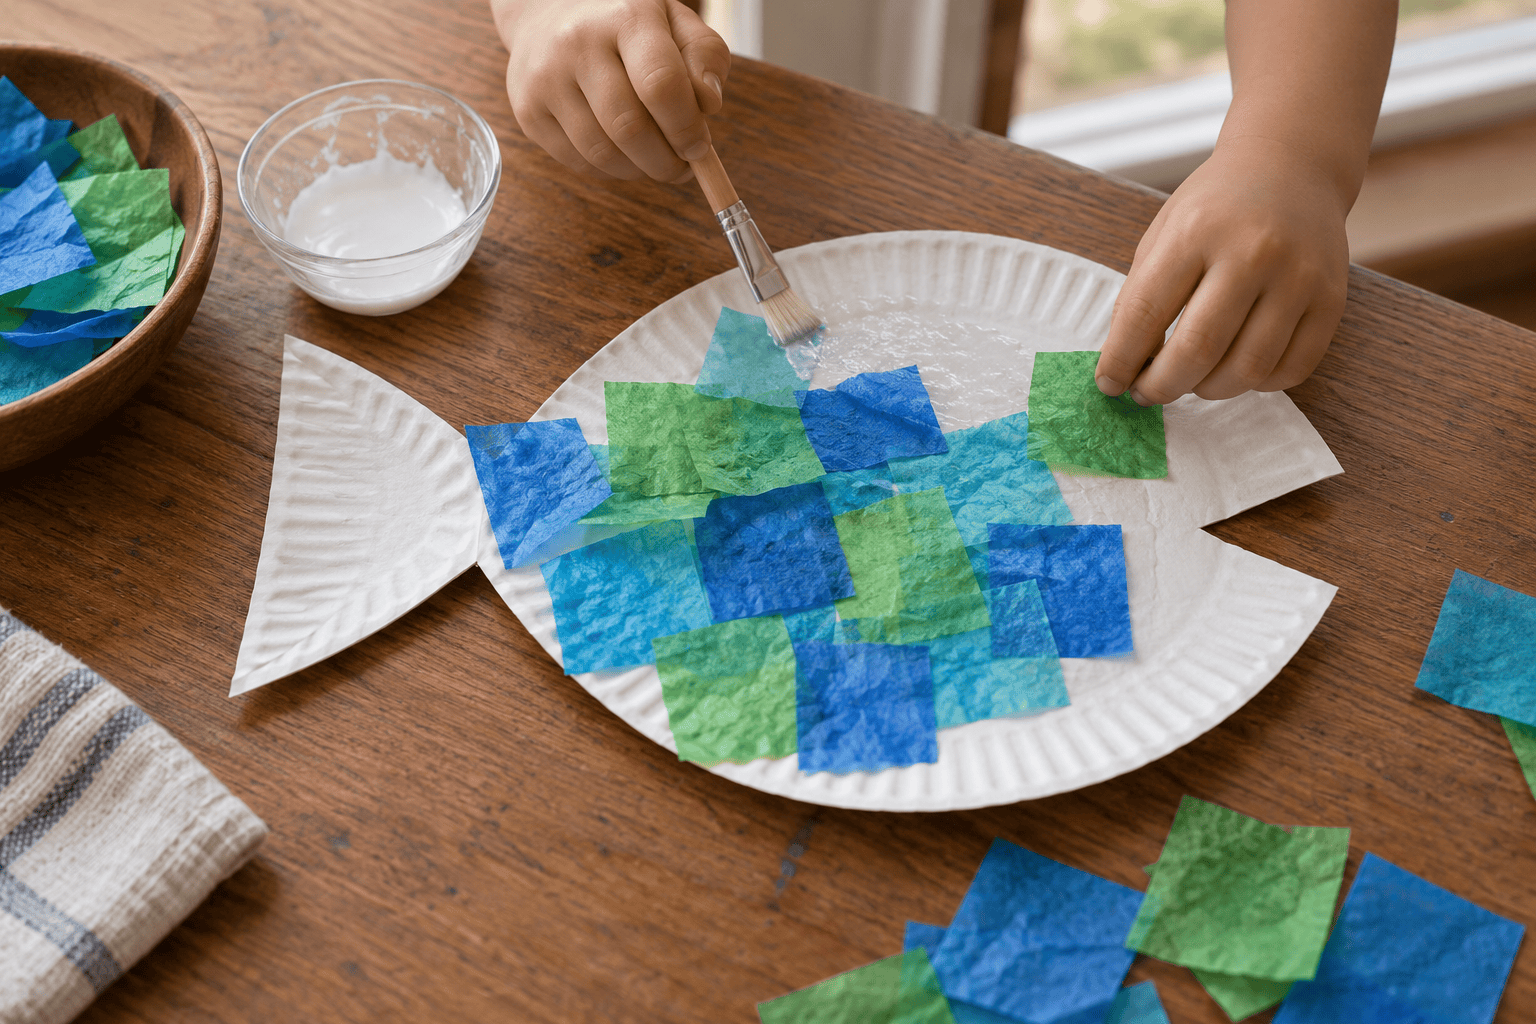
One cut gives this fish both a mouth and a tail. Cut a triangular wedge from the side of a paper plate, move that wedge to the opposite edge, and suddenly you have a fish instead of a circle your toddler insists is a fish. Then comes the satisfying bit: overlapping pieces of blue and green tissue paper that look like scales without requiring anybody to draw scales.
Your toddler can tear or choose the tissue pieces and press them onto small glue patches. You handle the plate cut, hold the tail while it attaches, and resist rearranging every square into a tidy pattern. Some fish are sleek. This one might have an extremely busy outfit. The important details are a tail with enough overlap, a mouth that stays open, and a body that does not get soaked with glue.
The tissue pieces here stick to a solid plate. In the tissue-paper suncatcher, they sit on clear contact paper so light can pass through. Keep a few unused tissue squares for that different finish if your child gets very interested in the colors.
Paper-Plate Fish with Tissue-Paper Scales
One fish made from a plate and its own cutout.
Materials
- 1 uncoated paper plate, about 9 inches across
- About 40–60 tissue-paper squares, roughly 1½ inches wide, in blue and green
- 2 large construction-paper triangles for fins, about 3 inches across
- 1–2 teaspoons white washable craft glue, added in small portions
- 1 large drawn eye, made with a black marker
Tools
- Adult scissors and pencil
- Small brush or glue spreader
- Washable mat and clean drying tray

Step-by-step method
- Mark the mouth. An adult draws two diagonal lines from the right rim toward a point about two inches inside the plate. This makes a triangular wedge. Keep plenty of plate around the opening; an enormous mouth leaves very little fish for your toddler to decorate.
- Cut and save the wedge. An adult cuts along the two lines and removes the wedge. Put it beside the plate rather than in the scrap pile. Rotate the plate so the mouth faces right. That little triangle is about to do a second job.
- Attach the tail. Place the wedge at the left edge, point toward the body and broad curved edge outward. Overlap the point behind the plate by about an inch. Glue it in place and let the join set, or secure the back with a broad strip of tape before continuing.
- Prepare two big fins. Cut two broad construction-paper triangles. Glue one behind the upper rim and one behind the lower rim with about an inch overlapping. Keep them away from the mouth gap and let the joins settle while you sort tissue colors.
- Brush on a small glue patch. Spread a thin layer over a section of the plate body about the size of your palm. Leave the mouth opening empty. Your toddler can press tissue onto the patch without trying to cover the whole fish in one breath.
- Lay down the first tissue row. Start near the tail side and place broad squares or torn pieces next to one another. Let their edges overlap a little. Press with a dry fingertip instead of brushing repeatedly over the top; wet tissue tears when it is scrubbed.
- Cover the next section. Add another small glue patch and another loose row of tissue, overlapping part of the first row. Work toward the mouth. Leave a clear patch above the mouth for the eye, or draw the eye on a separate large paper circle and glue that there later.
- Check the outline and dry. An adult trims any tissue hanging across the mouth gap after the glue dries. Draw one big eye on the dry face area. Lay the fish flat with the tail and fins supported until the attachments feel secure.
How to get a scale effect without tiny fiddly pieces
Overlapping makes the effect. You do not need little half circles, a punched paper supply, or a forty-minute cutting session. Large squares show changes in color where thin tissue overlaps. Tear some pieces if your toddler likes tearing; keep them big enough to pick up and position.
Glue a small area, place a few pieces, then rotate the fish or move to the next patch. Thin white glue can dampen tissue enough to wrinkle it, which is fine, but a puddle makes a soft hole. If you want to coat the top, do it very lightly once the first layer has settled. The main attachment happens underneath.
If your child would rather work with broad sturdy strips than delicate tissue, the paper-plate lion’s construction-paper mane is less likely to tear when pressed. The same leftover pack of plates can support both animals, but the assembly feels different.
Troubleshooting
Tissue tears into mush
There is too much glue or too much brushing. Stop scrubbing the wet patch and let it settle. Use less glue underneath the next few pieces and press them with dry fingertips.
The tail flops sideways
The wedge has too little overlap. Add a broad tape strip across the back of the join, or reposition it so about an inch of the pointed end rests behind the plate. Let glue set before lifting.
The mouth disappears
Loose tissue has covered the gap. Let it dry, then an adult trims along the original mouth edges. Do not try to pull wet tissue away; it may lift the surrounding scales.
The plate body curls
The surface is too wet. Lay it flat to dry and avoid adding more glue. Next time brush one small patch at a time and use an uncoated sturdy plate.
Tissue edges lift when dry
Touch a tiny amount of glue underneath the loose edge and press gently. Repair the few pieces that catch on fingers rather than coating the whole fish again.
Three ways to change it
Warm-color fish
Use pink, orange and yellow tissue instead of blue and green. Keep the same plate cut and broad fins. Your child can make a fish that looks like it has dressed for a party without changing the method.
Big torn patches for age two
Offer fewer, larger tissue pieces and help with the glue brush. The fish can have five broad color patches rather than rows of squares. Keep the plate cutting and outline cleanup with the adult.
A pair swimming together
Make two fish facing opposite ways by cutting the second mouth from the left. Attach its wedge-tail at the right. Display the pair on a sheet of blue paper after both are dry.
Finishing the ocean scene
Check the plate’s back before picking it up. Glue beneath the tail may still feel damp even when the tissue on the front looks dry. Support the body and tail with two hands for the first lift. A fish that survives the trip from table to wall has already passed the most relevant household test.
For an ocean partner that moves when hung, the paper-plate jellyfish uses a half plate and broad tissue tentacles. You can use the same tissue colors so the two look at home together, while the fish stays flat and the jellyfish hangs.
An adult can tape the dry fish onto a large blue paper background or prop it against a shelf. You can draw waves behind it with crayons. If your toddler wants a watery painting background with white lines, make painter’s tape watercolor art on a separate sheet and let that dry before attaching the fish.
Save unused tissue squares in an envelope instead of putting them back into the big tissue pack, where they will become confetti. The low-mess toddler crafts list has more ways to use a small supply stash later. For now, wipe the glue brush before it hardens into something resembling a second fish fin.
Questions parents ask
How do you cut a paper plate into a fish?
Cut a small triangular wedge from one side for the mouth. Attach that same wedge to the opposite side as the tail, with its pointed end overlapping behind the body. An adult should do the cutting.
What glue works for tissue-paper fish scales?
A thin layer of washable white craft glue works on an uncoated plate. Spread a small patch rather than coating everything at once. Too much moisture makes tissue tear.
Do the scales have to be circles?
No. Large squares and torn pieces make overlapping color patches that suggest scales. Keep the pieces easy for your toddler to handle instead of cutting dozens of tiny shapes.
Can I make this fish without tissue paper?
Use broad construction-paper patches or color the plate with crayons. Construction paper needs a firmer press and a little more glue beneath each piece. Keep the wedge-mouth and tail method the same.
How do I keep the tail from falling off?
Give the pointed end about an inch of overlap behind the plate and press the join firmly. A broad tape strip across the back can reinforce it. Let liquid glue dry before lifting the fish by its tail.


Leave a Reply